Monday, February 04, 2013

Hello, Kitty

Trish's daughter is a fan of Hello Kitty.  I've never gotten that myself, but I'm no young'n. 

When Trish asked me to make a cake, my first question, as always, was 'Are you looking for any specific decoration?', so of course the answer was Hello Kitty.

I tried a new buttercream recipe for this cake - one that is all over the web - a little butter, lots of sugar and some cream.  It turned out ok.  I had some issues with consistancy, but I got it to work.  I'm not a fan of the outcome of it though.  It was very sweet.  Too sweet for what we like in my house, but I'm looking forward to what she has to say about it.  I don't know that I'll use that exact recipe again, but if it's a hit, I might try to adjust mine slightly to make it a little sweeter.  Time will tell.

Back to the cake.  I used my favourite recipe and two 8" layers with a 'healthy' slathering of icing in between.  I had fun carving the shape - I did it totally freehand, and had to fix a few spots after the fact to get the ears right.  I probably should have used a square cake to make this easier but there would have been so much waste.  And by waste, I mean snacks for the rest of my day.  And by snacks I mean that's all I would have eaten all day.  This cake is very good.

I'm very happy with the outcome.  While the overall shape of the cake wasn't perfect, the outline of Kitty is pretty spot on.  And she's so easy to decorate - I originally had her eyes too close together, but that was an easy fix.  That's really the only thing that can go wrong.  

Hello, Hello Kitty cake


Happy Birthday Taylor.  I hope you enjoyed your cake!

Saturday, January 12, 2013

Dash 8

Samantha is a new friend of mine.  She's an amazing photographer, and we met due to common bond - our men are both pilots.   When her hubby got a new job, I was thrilled when she asked me to make the cake for his congratulations party.  I was very excited to have creative licence too.  She had a very small list of things she wanted.  Very small... ie.  1.  Just to make sure the new company's logo was on the cake.  The rest was up to me.


Pretty Close!

Me being me, my head went in 7 different directions.  A model of the new airport layout?  Simple tiered cake with cascading colours of the company?  A replica of the cockpit?  Drawing of the control panel?  A square cake with a giant tail fin sticking out was my second choice.

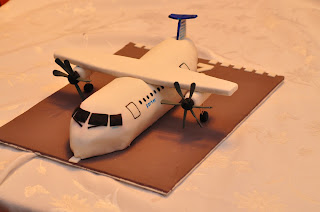
But none of them were right.  I really wanted to test myself.  So here is the start of an almost to scale Dash-8, Jonathan's new office:

Dash 8 Cake

I had some structural issues to figure out.  A Dash-8 tapers up off the ground at the back, and the wings are on the top of the body.  Fondant can work, but gum paste really is the best.  It's drying right now, and hopefully I made it the right size, because there is no trimming or fixing - it's a one shot deal.

Here's the wing, complete with flaperons (a word I thought was made up when I had my wing anatomy lesson yesterday).  It should have flaps and ailerons, but I'm working on a cake here... things are going to be off.


Disaster struck!  The wing didn't make it :(. The gum paste wasn't dry enough to support the weight of the prop and engine while letting some 'paint' dry, and it broke into 4 pieces.


A little fast thinking with less than 10 hours to delivery, I covered some cardboard with fondant and let it stiffen up over night. It's a better shape now, but doesn't have the details on it that I wanted; flaps and a more realistic profile.  I clearly need more practice with gum paste.

Dash 8 Cake


The engines are krispy treats, covered in fondant, and I stuck the props in them, and attached the landing gear for added support.  This step was not easy.  Next time I'll have to attach the engines way ahead of time to let the glue have lots of time to harden. 


I got to have fun with my board as well.  I normally just leave the board plain -silver foil, but a plane should sit on a runway.  And yes, Jonathon's new base flies off the number 26 runway most of the time.  (I have to tell you, I quite like having a personal airplane consultant at my beck and call)

Airport
26!
Little windshield wipers!


Airplane Cake
Finished Dash 8 Cake

Sadly, a propeller snapped off this morning.  Another lesson: make extras of everything!  I was tempted to pull off more to give each one only 3, but it wouldn't have been right. 


Airplane Cake


 No matter how much I plan, and take measurements, it's never quite spot on.  I'm very happy with the finished product, even if it isn't accurate and to scale.


Friday, December 14, 2012

Spare Tire Cake

Broden is a guy who loves cars.  Lately he has really started to appreciate spare tires.  
I know, I don't get it either.  

For Broden's birthday, his parents thought it would be funny to give him a spare tire cake.  

Oh.  Broden is 2.  :) 
From his car seat, he points at every jeep and SUV with a spare tire hanging on the back.  He thinks it's the funniest thing in the world, so it was only natural to make this cake for him.

I was a little worried about turning my standard cake into chocolate - I've had bad luck in the past, and didn't want to deal with a failure today.  A little hunting, and I found essentially my exact recipe already made with cocoa!  As an added bonus, this recipe had a few different tricks to it, that I am going to apply to my vanilla recipe to make it ever better!  Mwa ha ha.  
Sorry... I got a little excited there.

I have to start remembering to take 'making of photos' to add in here - I was just so covered in cocoa that holding my camera didn't seem like a good idea.

After a crumb coat and some resting in the fridge, here's the start!

I'm so glad I picked up the pre-coloured fondant.  I would have had to use a whole bottle of colour to get it this true of a colour.  Worth the two extra dollars!  The treads took a little fiddling with, and I decided that a half missing design would look the best.

I was looking forward to designing the hubcap.  I made a decent gray, then used my silver luster dust to get some chrome on there... if only I could have made it spin... another time.

I was jumping back and forth as to when to move it on.  Wait till it dried so I didn't smudge the paint, but risk it having hardened and maybe crack it, or do it right away and risk it tearing from being soft and losing its shape.  I decided to move it right away as I was very happy with the look and didn't want to have to make it a second time.

 The finished product.  I'm very happy with it, and would only make one or two changes the next time.  I can see this being fun for a real car fan and adding more details behind the hubcap - brake pads, better treads, inflation valve...
Finished Spare Tire Cake


Sunday, December 02, 2012

Business names

So, apparently it's hard to go public and try to actually come up with a name that works now, and in 20 years.  Sadly for me, there are a lot of small cake businesses out there, so finding a unique name is no easy task!

I spent some time chatting with and old friend and her husband coming up with some ridiculous names; can you picture calling a bakery and being greeted with 'Nom Nom Nom'?, Cretinous cakes? Mounds of Nom?

But there were a few winners.  I have a short list from them, a few of my own, and some from other friends.  I'm not posting any real contenders until I rule them out, but man, this process is proving harder than I thought!

Here are a few of the 'close but no cigar's:
Inspired Icing
Death by cake
Eat me
Sweetcheeks
Flour

Any suggestions?
 

Sunday, November 25, 2012

Christmas Sugar Cookies

While working on my last order, the Tiger Cat logo cookies I was smart and made a double batch of both the dough and icing to make some samples for the hopeful Christmas orders I'll bring in.  So just for fun, here they are!


Ticat Cookies

I know I said I liked a challenge, but I think I bit off more than I can chew on this one.  

Betty, a big Ticat fan, wanted to be the awesome big sister she is and stick it to her brother that her team did better than his this year, the BC Lions.  She wanted a cookie decorated with this logo...

www.ticatfans.com

Doesn't seem that complicated; 4 colours, basic lines, but you know what... it kind of is.  It's just the logistics of it.  
And if you know me... I like to plan.  A great deal.  It makes me happy :)  (Not to mention the overthinking...  Oh yeah.  I'm all about the overthinking)
How many layers?  
Black outlines first, then flood white and do the rest on top? 
Or all black first and fill in the holes.

I did a test cookie to see how things would go.  Not the best, but it's there.  

 Not quite angry enough... yet.

 I desperately wanted to eat this cookie.  You have no idea.  They are delicious - Full on childhood memories here.  But sadly, I only made 8 extra cookies to mess up, so this one had to make it through the night just in case.

All in all, that cookie only took 20 minutes, and I only have to make 12, so that's not too shabby, and I anticipate the each one being faster since I always find a shortcut along the way.  A few notes for the next one... Whiskers at the very end, flatter ears, more pronounced teeth, but onward.

Next cookie, better.  Still not the best, but better.  By the time I hit cookie #5, I wasn't even looking at the picture any more.  I think I averaged 2.5 minutes of outlining for each cookie, which just blew me away.  I really was expecting 10-15 minutes for that part alone.


Halfway there.  All that is left now is the white bits, but I really want to make sure that black is set before I add the white.  A few more hours just to be safe. 


So happy with the turnout!

Oskee Wee Wee!


Thursday, November 22, 2012

Glamour Cupcakes

A client was heading to a fancy jewellery party, and didn't want to go empty handed, so hello pretties!


These cute cupcakes started off with frilly jewel toned discs; each topped with a fondant piece of jewellery.  They were incredibly small, and much more difficult than I anticipated, but fun at the same time.  I love a challenge!


My perfect cupcake recipe  - a secret for now - always cools off with flat top, making it the perfect canvas for a dollop of buttercream.


Then a cute ring perched right on top...

Or maybe a charm bracelet.


Or was that a pair of pearl earrings?


Nope... Emerald drop necklace. 


Saturday, November 10, 2012

Dora's Friends

A very special 4 year old was looking for a Dora themed cake for her birthday.  I decided to go a bit different, and feature Dora's friends Backpack and Map instead of the little adventurer herself.

This went together very quickly and easily.  I gave myself 2 hours for the decorating, and finished my photo shoot just shy of that time!

I definitely have some ideas for the next time I do a cake like this that will make it go faster and a little smoother.


Dora the Explorer Cake

Dora the Explorer Cake