I generally write the bulk of my posts before I start working on a cake or while it's in the oven because I know what my generic plans are. It gives me time to write up a little blurb about why I am making the cake, talk about the customer, or any techniques that I needed to study to make it happen, before the cake is done and I'm beat and put it off for a few days (in this case... a month!).
I was a little iffy to do this one ahead of time. I came up with the idea for my sister in-laws cake last night for her party tomorrow (my brother forgot to tell me about the party, assuming our parents would pass it on, forgetting that I don't live with them anymore. Silly Jeff) and really think this might be a little complicated. Boyfriend suggested I make a giant candle for a cake, and I really toyed around with that for a while. A dowel in the top with rice crispy treats shaped like a flame covered in fondant up top. It would work, and it would be adorable. But not for Vicky. That would work for a kids birthday. Or maybe for his party next year.
Vicky is a great mom and has gotten into sewing clothes for her daughter, so I thought a sewing machine would be fitting. I found a few cute styles and just figured I would wing it. Something generic, not modeled after a specific brand or machine, just one that looks like a sewing machine.
When I was picking up supplies at my local bulk store, I saw the sprinkle bins and had a brainwave! The long sprinkles would look like stitches, so I decided to put a piece of 'fabric' under the needle and have the stitches spell out Happy Birthday Vicky.
I read a bunch of pages on how to make one of these, and noticed that most people had an issue with the rice crispy top. I liked the idea of using crispies, and figured I could find a way to make it work. However, I didn't do any reading... I just thought I would do it different/better. Nope. The fondant is too heavy and is pulling it down. I popped the crispies in the fridge to harden up, but it wasn't enough. Maybe 3 day old stale crispies, but who would want to eat those? I know I should have bought another cake board to sit it on. I knew this as I left the bulk store 2 days ago, but stupidly, I thought I could make it work.
Silly Jen.
On to the Cake:
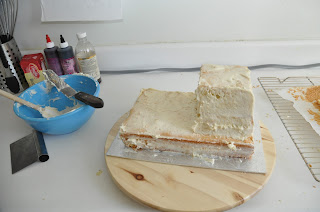
I started with a half slab and used just shy of half for the bottom and cut the rest in 3 to stack for the tall side bit.
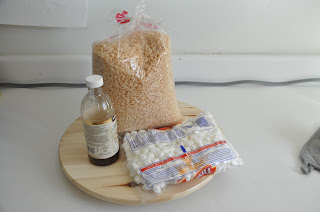
Next it was onto the structural element - the crispie treat top. This can only mean one thing - delicious crispie treats! Ok two. Crispie Treats and some very sticky hands.
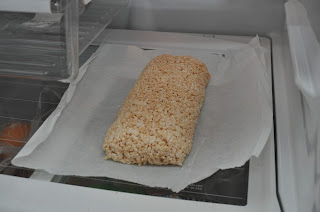
I shaped the top piece and set it in the fridge to harden up a bit to see if that would fix the drooping.
While that was doing nothing in the fridge, I moved on to a decorative piece. Can you guess what it's going to turn into?
When the top was sufficiently hardened (ha!), and all the fondant was on the bottom, I popped it on top and covered it in buttercream to try and fill in all the yummy nooks and crannies, and to help the fondant adhere better. I used some doweling to be both the needle and the support. I think this would have worked very well for a support if I had the cake board under the whole crispie.
All that was left to do now was to finish off the fondant work and add all the decorations
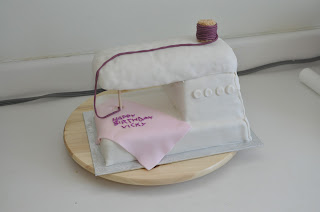
Finished Product! Definitely a 'first attempt' looking cake, but I was very proud of it. So many notes for next time, but Vicky and family loved it. And I loved the crispie top that I got to bring home. I sliced it like biscotti, and shared it at work the next day. It almost didn't make it there.
In the end, I am very happy with the outcome. I worked around some problems with 3d fondant work that I had with the dump truck, and this looks much better. I still have some seams visible, and if this weren't for a family member I would have worked a little longer to hide them better.
I don't like how the fondant looks over the crispies, but short of doing two layers of it, or fully coating it with buttercream I think that will always show. I could have made the top out of cake resting on the cake board, and it would have had the smooth finish that I was hoping for, but there are only 11 of us eating it, and that would have just been way too much cake. Yes, leftovers are great, but last time I went over board on the Barbie cake they were eating cake for a week. Not the end of the world, but they didn't want cake in the house that long.
I know it's starting to become routine to end every post saying 'lesson learned', but truly this time I have learned a few things:
1. I am good at what I do, but I can't assume that I can just fix a problem everyone else has with out researching.
2. If I realize I am taking a shortcut that I probably won't work out, stop and do it right. My work will only turn out better.
3. Laziness is not a reason to cut corners. I needed another cake board, but I didn't want to drive 3km to go can get it. Or even still, didn't want to walk back in to the store before leaving the parking lot when I realized I needed it.
I can only grow and get better if I learn from my mistakes.
I hope I get another chance to make a sewing machine. I could really make it much better next time.
I read a bunch of pages on how to make one of these, and noticed that most people had an issue with the rice crispy top. I liked the idea of using crispies, and figured I could find a way to make it work. However, I didn't do any reading... I just thought I would do it different/better. Nope. The fondant is too heavy and is pulling it down. I popped the crispies in the fridge to harden up, but it wasn't enough. Maybe 3 day old stale crispies, but who would want to eat those? I know I should have bought another cake board to sit it on. I knew this as I left the bulk store 2 days ago, but stupidly, I thought I could make it work.
Silly Jen.
On to the Cake:
I started with a half slab and used just shy of half for the bottom and cut the rest in 3 to stack for the tall side bit.
 |
| I could have turned it into the Monty Python foot from here... |
 | |
| Deliciousness assemble! |
I shaped the top piece and set it in the fridge to harden up a bit to see if that would fix the drooping.
 |
| It didn't. |
While that was doing nothing in the fridge, I moved on to a decorative piece. Can you guess what it's going to turn into?
 |
| No, not a crispie lolly-pop. Although that's what I really wanted it to be. |
 |
| How about now? |
When the top was sufficiently hardened (ha!), and all the fondant was on the bottom, I popped it on top and covered it in buttercream to try and fill in all the yummy nooks and crannies, and to help the fondant adhere better. I used some doweling to be both the needle and the support. I think this would have worked very well for a support if I had the cake board under the whole crispie.
 |
| You can actually tell what this is supposed to be here! |
All that was left to do now was to finish off the fondant work and add all the decorations
 |
| I should have covered the crispie to look like wood, but cute none-the-less. |
Finished Product! Definitely a 'first attempt' looking cake, but I was very proud of it. So many notes for next time, but Vicky and family loved it. And I loved the crispie top that I got to bring home. I sliced it like biscotti, and shared it at work the next day. It almost didn't make it there.
In the end, I am very happy with the outcome. I worked around some problems with 3d fondant work that I had with the dump truck, and this looks much better. I still have some seams visible, and if this weren't for a family member I would have worked a little longer to hide them better.
I don't like how the fondant looks over the crispies, but short of doing two layers of it, or fully coating it with buttercream I think that will always show. I could have made the top out of cake resting on the cake board, and it would have had the smooth finish that I was hoping for, but there are only 11 of us eating it, and that would have just been way too much cake. Yes, leftovers are great, but last time I went over board on the Barbie cake they were eating cake for a week. Not the end of the world, but they didn't want cake in the house that long.
I know it's starting to become routine to end every post saying 'lesson learned', but truly this time I have learned a few things:
1. I am good at what I do, but I can't assume that I can just fix a problem everyone else has with out researching.
2. If I realize I am taking a shortcut that I probably won't work out, stop and do it right. My work will only turn out better.
3. Laziness is not a reason to cut corners. I needed another cake board, but I didn't want to drive 3km to go can get it. Or even still, didn't want to walk back in to the store before leaving the parking lot when I realized I needed it.
I can only grow and get better if I learn from my mistakes.
I hope I get another chance to make a sewing machine. I could really make it much better next time.


No comments:
Post a Comment