Sunday, June 09, 2013

White themed party

Veronica threw her husband Ronen a big 40th birthday party.  Everything was to be white: crisp and clean.  

She came to me wanting a cake that was on the cover of a parenting magazine.  It was cute; 2 tiers, covered in buttercream with chocolate discs stuck to the sides.  They are called Merkins around here, and you buy them to melt for making lolly pops.  I had never thought of using them as the decoration before.  It was an interesting outcome and would be very cute for a polka dot party for kids.  Not for a grown up party.  It just didn't fit with what she was describing.  

I showed her a picture of the first real wedding cake I did:

Jen Bakes Cakes
  

It was so simple, but so effective.  Covered in coarse sugar it sparkled anytime light hit it.  In a big wedding hall with a disco ball, anytime you looked at it it shone.  

Veronica loved the idea.  Much more sophisticated than her picture.  

I have to say... I mentioned the cake when she said it was a white party mainly because I really wanted to make this again.  It's an easy cake to make, and takes all of 10 minutes to decorate.  With the Monkey cake being a demanding cake, if I was doing another the same day it had to be simple.  Yes I cheated and talked the customer into what I wanted, but it worked out in the end - she got a stunning cake that fit the theme, and I didn't have a lot of work to do for it.  


I really wish you could see the sparkliness of this cake.   Even in diffused daylight, every time you move your head something different is shining.


 The finished product:
I couldn't be happier with this one.  I had a great weekend for cakes!  2 winners.  :)
 
Jen Bakes Cakes
It's there...


Jen Bakes Cakes
Too bright from the flash attempting to show you the sparkles. 
 

Jen Bakes Cakes

   
Two big cakes for the same day was tough.  It was easy baking and getting the prep work done, it it really took all of my energy to get them finished.  I know my day job schedule killed me for this.  I should not have been so tired, but I worked some terrible hours this week.  

New lesson:

Don't take on more than you can do.  Had this cake been more complicated, it would not have been ready for pickup.  While 2 cakes on one day isn't bad, with what I was working it was a bad idea.

A monkey for Mateo

I got a call from an old colleague needing a cake for his son's first birthday.  They knew they wanted a monkey themed cake but weren't sure on exactly what they wanted.  I sent them googling, and they cake to me with a very cute single layer cake with monkeys and palm trees.  Carlos ran with that and we made some changes since he wanted a 2 tier cake. 

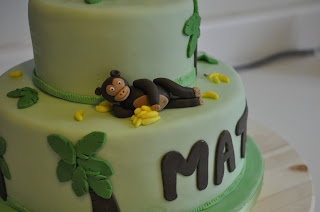
This was a very fun cake.  I was a little skeptical of my skills with fondant sculpting, as the most I've done before is cars and shoes for a christening cake.  I found a tutorial and fiddled around and gave it the ol' college try.  A successful test run, and Carlos was in business for monkeys on a cake. 

The real monkeys took some time.  Roughly 2 hours for the both of them.  This was new territory for me, and I wanted to do it right, so I took my time.  I'm amazed at how well they turned out.  I don't have to be afraid of sculpting anymore.


Jen Bakes Cakes
Death stare aside, super cute!

 The monkeys were to be surrounded my bananas, so I spent a little time making tiny bunches of bananas.  Staking them to look natural was trickier than one would think. 

Jen Bakes Cakes
I've got a lovely bunch of ... bananas


The finished product:  My Monkey Cake!

This turned out better than I was expecting.  Leaps and bounds better.  I should have charged more to be honest.  I tend to give family and friends a bit of a discount, especially when trying something new in case it doesn't turn out well.  But this... this was a masterpiece.  There is nothing about it I wished I did differently - that's rare to say. 

Those are some happy monkeys!
Jen Bakes Cakes
Oh these?  Just an afternoon snack.

 I made the trees go all the way around so it wasn't bare at the back.  I love how they turned out. 

Jen Bakes Cakes
And yes... I made sure to hang the bananas the right way

Here she is!  

Jen Bakes Cakes

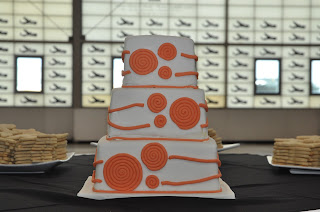
Holy Orange!

Natalie and Josh are the type of bride and groom that anyone in the wedding industry dreams of working with: laid back and open to suggestions. While it can be a nightmare working with someone who has no idea what they want, this was different. The little details just didn't matter. All they wanted was a great party with friends and family. 

I've known Natalie for 3 or so years now, being a long time friend of my fella, so I was very excited to find out she was getting married. Then I was a little hurt when I found out they weren't going to have cake; what's a wedding without cake!?! (It's Jen out of business... that's what!)

She said they weren't cake people, and I respect that.  Not everyone is, I just try to convert them ;)  Being the amazing girl she is, she said 'If it will help you out, make that our gift'.  I can work with that. 

I had grandiose plans of making a giant airplane; they are both pilots and were getting hitched at a warplane museum, so it seemed only fitting.  But after making the Dash-8 cake a few months back, I knew I wasn't ready for that to be featured in a wedding.  Instead I just went for fun and whimsical to match the happy couple. They chose orange for their colour. Not just orange...ORANGE.  Think highlighter, or that tux from Dumb and Dumber. Orange. 

I decided to try to do the ganache method for covering cakes before fondanting, and so far... Not a fan. Unless my recipe was off, I have never had so many issues with sagging fondant.  I'm actually a little disappointed with the final product. It wasn't as crisp and clean as I was expecting from all I've read about ganache.   Live and learn. I'll stick to what I know. 

On to the bake!

Happily, I discovered my oven handles double rack baking, so baking 9 layers of cake was done very quickly. My old oven would have taken 3 times as long.  And that was a much bigger oven.

I was also making 250 sugar cookies for the wedding, so time this week was limited and very valuable. As it was, I was up late every night for a week with those, so not needing 3 days to bake the cakes was fantastic. (It's not easy having a job outside of cakes.)

Easy to fill, but the frosting with ganache proved to be more difficult that I had hoped. I had heard such great things, but  I don't think it's for me. I followed the recipe to the letter, watched the video as I did each step, but it just wouldn't set up. Maybe it was too runny, maybe I put it on to thick... I'll try it again for a family cake and see if I can make it work.  The results look astounding. Perfect corners, crisp lines. It's my style. 

The fondant decorations posed another challenge. Think back to your Play-dough days... I needed to make ropes - 3 feet long and perfectly cylindrical. I spent a week researching tools to make it work.  There was no way I could roll out 'snakes' and get them that long and even.  Some sites recommend a clay extruder that is used for clay craft, but it was impossible to find in my area, and couldn't be ordered to get here in time.  I had a back up plan using a very large sterile syringe from my day job, but I forgot to bring it home to practice.  While out shopping for real life, we were in a mall with a well known kitchen supply store.  I asked the nice gentleman if they had anything like an extruder, and he actually recommended a heavy duty cookie gun... the one with all the disks you use for shortbread.  I can't believe I didn't think of that!

I had to use a combination of disks to get a single hole, but it worked!  It hurt my forearm something fierce with all the squeezing, but it worked, and in much less time than I was expecting.

As mentioned, I'm not happy with the finished product.  I maintain that the ganache was too soft and with the weight of the fondant it kept sliding down.  I attempted to patch it up on site, but the damage was too far gone.  Parents of the bride and the happy couple them selves loved it and didn't notice any damage but it's all I could see - that's always the case.  I am glad that this was a free cake.  I would have felt bad if someone paid full price and had it turn out like this, even with how little I charge.  I would have given a partial refund for sure.

Nevertheless, its an adorable cake.

Jen Bakes Cakes
Non symmetrical lines... this drove me crazy!

Jen Bakes Cakes
Cake, cookies and a hangar door.  Spot on for this couple.

Jen Bakes Cakes
Cookies in formation.  I think that's a formation anyway...

Jen Bakes Cakes
And the reason we were there... Planes!
 
As usual:  Lessons learned:

1.  Don't try anything new on a customer cake.  That's what family and friends are for.  "Hey, I tried something out... want a free cake?'  Who's going to say no to that?
Make sure it works first.

2.  Time management.  This order took a huge chunk of time.  I worked my day job everyday that I had to be doing something for the cake.  Even if I were making a profit on this, it wouldn't have been enough to warrant not working the day job, but I should have spend time the week before making the cookies and froze them.

3. Research.  I know this, yet I still assume.  I had never done a technique like this before, and I knew months in advance that I was doing it, so there was no excuse for not knowing how I was going to pull it off.

Sewing Machine

I generally write the bulk of my posts before I start working on a cake or while it's in the oven because I know what my generic plans are.  It gives me time to write up a little blurb about why I am making the cake, talk about the customer, or any techniques that I needed to study to make it happen, before the cake is done and I'm beat and put it off for a few days (in this case... a month!).

I was a little iffy to do this one ahead of time.  I came up with the idea for my sister in-laws cake last night for her party tomorrow (my brother forgot to tell me about the party, assuming our parents would pass it on, forgetting that I don't live with them anymore.  Silly Jeff) and really think this might be a little complicated.  Boyfriend suggested I make a giant candle for a cake, and I really toyed around with that for a while.  A dowel in the top with rice crispy treats shaped like a flame covered in fondant up top.  It would work, and it would be adorable.  But not for Vicky.  That would work for a kids birthday.  Or maybe for his party next year.

Vicky is a great mom and has gotten into sewing clothes for her daughter, so I thought a sewing machine would be fitting.  I found a few cute styles and just figured I would wing it.  Something generic, not modeled after a specific brand or machine, just one that looks like a sewing machine.

When I was picking up supplies at my local bulk store, I saw the sprinkle bins and had a brainwave!  The long sprinkles would look like stitches, so I decided to put a piece of 'fabric' under the needle and have the stitches spell out Happy Birthday Vicky.

I read a bunch of pages on how to make one of these, and noticed that most people had an issue with the rice crispy top.  I liked the idea of using crispies, and figured I could find a way to make it work.  However, I didn't do any reading... I just thought I would do it different/better.  Nope.  The fondant is too heavy and is pulling it down.  I popped the crispies in the fridge to harden up, but it wasn't enough.  Maybe 3 day old stale crispies, but who would want to eat those?  I know I should have bought another cake board to sit it on.  I knew this as I left the bulk store 2  days ago, but stupidly, I thought I could make it work.

Silly Jen.

On to the Cake:

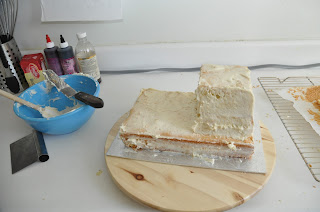
I started with a half slab and used just shy of half for the bottom and cut the rest in 3 to stack for the tall side bit.


Jen Bakes Cakes
I could have turned it into the Monty Python foot from here...
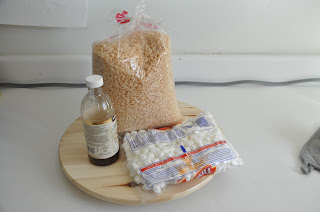
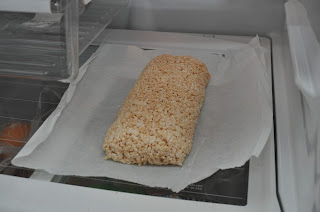
Next it was onto the structural element - the crispie treat top.  This can only mean one thing - delicious crispie treats!  Ok two.  Crispie Treats and some very sticky hands.
Jen bakes cakes
Deliciousness assemble!

Jen Bakes Cakes

I shaped the top piece and set it in the fridge to harden up a bit to see if that would fix the drooping.

Jen Bakes Cakes
It didn't.

While that was doing nothing in the fridge, I moved on to a decorative piece.  Can you guess what it's going to turn into?

Jen Bakes Cakes
No, not a crispie lolly-pop.  Although that's what I really wanted it to be.
Jen Bakes Cakes
How about now?

 When the top was sufficiently hardened (ha!), and all the fondant was on the bottom, I popped it on top and covered it in buttercream to try and fill in all the yummy nooks and crannies, and to help the fondant adhere better.  I used some doweling to be both the needle and the support.  I think this would have worked very well for a support if I had the cake board under the whole crispie. 

Jen Bakes Cakes
You can actually tell what this is supposed to be here!

 All that was left to do now was to finish off the fondant work and add all the decorations


Jen Bakes Cakes
I should have covered the crispie to look like wood, but cute none-the-less.

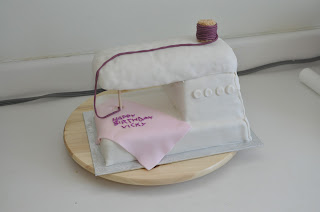
 Finished Product!  Definitely a 'first attempt' looking cake, but I was very proud of it.  So many notes for next time, but Vicky and family loved it.  And I loved the crispie top that I got to bring home.  I sliced it like biscotti, and shared it at work the next day.  It almost didn't make it there.


In the end, I am very happy with the outcome.  I worked around some problems with 3d fondant work that I had with the dump truck, and this looks much better.  I still have some seams visible, and if this weren't for a family member I would have worked a little longer to hide them better.

I don't like how the fondant looks over the crispies, but short of doing two layers of it, or fully coating it with buttercream I think that will always show.  I could have made the top out of cake resting on the cake board, and it would have had the smooth finish that I was hoping for, but there are only 11 of us eating it, and that would have just been way too much cake.  Yes, leftovers are great, but last time I went over board on the Barbie cake they were eating cake for a week.  Not the end of the world, but they didn't want cake in the house that long.

I know it's starting to become routine to end every post saying 'lesson learned', but truly this time I have learned a few things:

1.  I am good at what I do, but I can't assume that I can just fix a problem everyone else has with out researching.
2.  If I realize I am taking a shortcut that I probably won't work out, stop and do it right.  My work will only turn out better.
3.  Laziness is not a reason to cut corners.  I needed another cake board, but I didn't want to drive 3km to go can get it.  Or even still, didn't want to walk back in to the store before leaving the parking lot when I realized I needed it. 

I can only grow and get better if I learn from my mistakes.
I hope I get another chance to make a sewing machine.  I could really make it much better next time.